

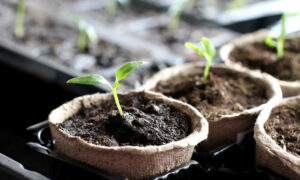
If you’ve been following along in our Growing Gardeners series, you should be seeing small seedlings starting to grow in your newspaper pots.
My kids enjoyed the work and challenges of creating their own seed pots, filling them with soil, and planting the seeds. They kept the soil moist and looked regularly for signs of life. When the plants finally broke through the soil, the excitement on the kids’ faces and the pride that welled up in each of them were clearly evident.
As for myself, I breathed a sigh of relief that the plants had emerged, but I knew the work had just begun.
Here’s what your growing seedlings will need.
Water
You will need to water your seedlings every 2 to 3 days—not every day, as overly wet soil is prone to developing fungus, which will kill your little plants. Let the soil dry until the top layer no longer feels wet to the touch before watering again. As your seedlings grow, you will want to water deeper, but while they are small, a gentle watering is all you need.
The keyword here is gentle. Pouring water out of a cup or container directly into your seed pot will disturb the soil and potentially float your seed or expose the roots. In our family, we like to use a milk jug to water seedlings.
If your family enjoyed making the newspaper seed pots, here is another easy craft: Use an ice pick to put 8 to 10 tiny holes in the lid of an empty, washed milk jug. Your little helper can even use permanent markers to decorate their new watering jug.
Fill the jug with a few inches of water and place the cap back on tightly. Your little helper can then hold the milk jug upside down over the seedlings, giving them the slow watering they require.
The potting soil you used in your seed pots will provide sufficient nutrients for your seedlings, so there is no need to add liquid fertilizer.
Light
Your seedlings will begin to seek light as their leaves begin to emerge. They need as much direct sunlight as they can get: 12 to 14 hours a day. For maximum sunlight, place the pots by a south-facing window.
You may notice that the seedlings will begin to grow in the direction of the light. It’s important for you to turn your seed pots or the tray that holds them every day. This will help keep your seedlings growing vertically, not horizontally.
Space
One of the most difficult things to do at this stage is to eliminate any extra seedlings that are growing in your pots. You will recall that we planted 2 or 3 seeds in each pot, to ensure we had at least one plant that would grow, but in the end you will only want one plant per pot. Seedlings don’t like to be crowded, as they need all the sun and nutrients they can get. Select the seedlings that are closer to the edges of the pot and lighter in color to remove.
Be careful when thinning your seed pots to avoid harming the plant you want to keep. The roots of all the plants can be intertwined, so instead of pulling the unwanted seedlings from the pot, I recommend using a pair of scissors to carefully snip off the tops. Once you have removed the weaker seedlings, water the remaining ones to make sure their roots are still covered in soil, in case your movement of the pots disturbed it.
Strength
As your seedlings begin to grow and stretch for the sunlight each day, their stems can become thin and not supportive enough for the plant. Insufficient sunlight and a sheltered environment can cause them to become leggy.
To guard against these leggy seedlings, make sure they are getting maximum exposure to sunlight each day. You will also want to mimic the wind they will eventually be exposed to in the day-to-day weather outdoors, which will help them develop the strong, thick stems they need to survive. The easiest way to do this is to set a small oscillating fan 6 to 8 feet from your plants, to provide them a light breeze. Leave it on low during daylight hours. If your fan doesn’t have an oscillating function, turn it on for five minutes at a time, 8 to 10 times each day.
If you don’t strengthen your plants now, they can easily become damaged when moved outdoors.
Looking Ahead
Many greenhouses or large-scale gardeners will start their seeds in very small seed pots and transition them to larger and larger seed pots as they grow. We won’t transition our seedlings, since we created large seed pots out of our old, biodegradable newspapers that can be moved directly to the garden in 10 to 14 days—after the seedlings have 3 to 4 fully developed leaves.
In the meantime, enjoy the opportunity to work with your little gardeners on growing their diligence and sense of responsibility for the health of these little plants. Work on the tasks together: Feel the soil and help them gauge when it’s too dry, identify the differences in the leaves of various seedlings (and come up with a creative way to label each pot, if you haven’t already), and measure their stems and track how much they grow over the course of a day or a week.
Make it fun, while learning from both the successes and the failures you will have on this gardening journey.
Following along? We encourage you to reflect on the activity with your young gardener and share your experiences here.
What part of this activity did you and your young gardeners most enjoy? What part was most challenging?
What were your most interesting observations as you watched your seedlings grow?
What did you use to mark or label your plants in each seed pot?
Matt Fowler, MBA, Ph.D., enjoys writing about his experiences at The Abundant Farm, an intentional farming operation in southeastern Illinois on the Crawfish Creek. The farm challenges the family in the building of a homestead by growing food, products, and character while teaching health and bounty to others.


Be the first to comment